
Day 1
Day 2
Day 3
Day 4
Send Data from Parent to child (Lab 4)
Making the child relation and Parent relation and passing the data from Parent to child.
That can be possible by defining @Input directive in the Child Component.
Suppose you have some value in Parent component and that you need to pass to the child component as like below.

To have a receiver of values passing from Paranet App.component to child.component
Need to import

And use that directive

Now the value need to pass from parent to Child from directive as.

Get the print of data that we are passing from Parent and display into child as.

You will get the output as

Sending Data from Child to Parent (Lab 5)
To send the data from child to parent it has to import the two directive here as

Than need to create the events emitter
Emitdata as an event emitter
Current is the variables from which pass the values

Now we should have the method which will receive the emitter in child side
So method have as addItems, we are going to add the values to array, that will present in child component

Than we need child.component.html have the code to raise the events as:

Now till that part we have created the child which will raise the events from child component.
Now we need to receive the events into the parent.
Now reciveItem will use here to recive the values and then pushing into array.

In app.component.html have the values to get the values and need to use the (send) directive here. Assign the method reciveItems to send along with the two parameters need to pass as,
$event as data and ChildCount

Out will be appears like.
Adding the Cow from Child event and now it is added to the array.

Inbuilt Events in Angular
The steps of which the event calls in angular child events.
In constructor you won’t get the @Input variable that is send from Parent component. @Input variable you will receive in ngOnInit Event only.

ngOnInit : The phase at which component is getting called than it will call this method.
ngDoCheck : It execute automatically, it will executes if any changes in instance members.
If there is changes in child, than it will call the parent do check and then child will call.

ngOnChanges : it will execute only when the change in input type variable. If same object is calling than it won’t execute. It will run only for new object.

Need to import all the Events modules there as.

Implementing the events to see how it will calls.

ngOnDestroy : Which will call when your component got changes and it will destroy the existing component.

Single Page Application (Lab 5)
Create a single page application in angularJS.
1. Create an application with the name as
Using command ng new singlepage

2. Open that application in visual studio code and run that application from terminal with port 4020

3. Install JQuery as need bootstrap which required jQuery.
npm install –save jquery

4. Installing the bootstrap[ Generally we need it for styling]. It will install latest version of boot strap.

5. Add bootstrap (js, css) and JQuery reference to the angular Cli file. (.angular-cli.json)

Any changes in angular cli, you need to rerun the Ng serve
6. Now create three component
Left
Right
Menu


Create banner under left body and enquiry form in right body

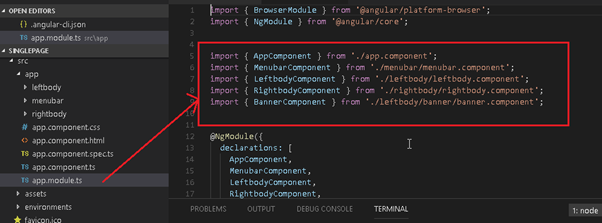
All the component will automatically registered into app.module.ts

7. Lets astart creating the page UI
a. Creating the top menu items.
It is the boot strap menu and that you can get it from bootstrap 4 site

Now need to add the selector in App.module.ts
Like selected for menu bar in <app-menubar>

You will get the output as:

8. Changes in the other part of the modules,
Before that you can include the left and right component in the main component(app.component.html)

You can see you will get the output as.

Due to few changes in CSS, getting the orange menu. In Body section it defined into two parts as left body and right body.

9. Adding the banner into left body component.
Banner.component.html

Banner.component.css

Now add the banner component to Left Body component as like below.

You will get the output as the following.

Routing of Single Page application
Add modules in the application as same as header names
Create the list of components which is existing on the navigation bars as like below.
It will exist in the path of routes, create it as like.
Routes\home
Routes\offices
Routes\offers
Routes\newcources
Routes\virtulclasses

Now your app.module.ts will be look alike similar to below screen.
All the component that you have added will appear like below in module file.

Now import the routemodule in app.module.ts as like below

Create a constant of all the component for route and import it to the modules as like below.
In app.module.ts

Now go to the left menu component and changes the routing as like below.

register the route values which need to show, so open the left body component and provide place to view the component.
<router-outlet></router-outlet>


You will get the output as

Day 1
Day 2
Day 3
Day 4
Day 2
Day 3
Day 4
Send Data from Parent to child (Lab 4)
Making the child relation and Parent relation and passing the data from Parent to child.
That can be possible by defining @Input directive in the Child Component.
Suppose you have some value in Parent component and that you need to pass to the child component as like below.

To have a receiver of values passing from Paranet App.component to child.component
Need to import

And use that directive

Now the value need to pass from parent to Child from directive as.

Get the print of data that we are passing from Parent and display into child as.

You will get the output as

Sending Data from Child to Parent (Lab 5)
To send the data from child to parent it has to import the two directive here as

Than need to create the events emitter
Emitdata as an event emitter
Current is the variables from which pass the values

Now we should have the method which will receive the emitter in child side
So method have as addItems, we are going to add the values to array, that will present in child component

Than we need child.component.html have the code to raise the events as:

Now till that part we have created the child which will raise the events from child component.
Now we need to receive the events into the parent.
Now reciveItem will use here to recive the values and then pushing into array.

In app.component.html have the values to get the values and need to use the (send) directive here. Assign the method reciveItems to send along with the two parameters need to pass as,
$event as data and ChildCount

Out will be appears like.
Adding the Cow from Child event and now it is added to the array.

Inbuilt Events in Angular
The steps of which the event calls in angular child events.
In constructor you won’t get the @Input variable that is send from Parent component. @Input variable you will receive in ngOnInit Event only.

ngOnInit : The phase at which component is getting called than it will call this method.
ngDoCheck : It execute automatically, it will executes if any changes in instance members.
If there is changes in child, than it will call the parent do check and then child will call.

ngOnChanges : it will execute only when the change in input type variable. If same object is calling than it won’t execute. It will run only for new object.

Need to import all the Events modules there as.
Implementing the events to see how it will calls.

ngOnDestroy : Which will call when your component got changes and it will destroy the existing component.

Single Page Application (Lab 5)
Create a single page application in angularJS.
1. Create an application with the name as
Using command ng new singlepage

2. Open that application in visual studio code and run that application from terminal with port 4020

3. Install JQuery as need bootstrap which required jQuery.
npm install –save jquery

4. Installing the bootstrap[ Generally we need it for styling]. It will install latest version of boot strap.

5. Add bootstrap (js, css) and JQuery reference to the angular Cli file. (.angular-cli.json)

Any changes in angular cli, you need to rerun the Ng serve
6. Now create three component
Left
Right
Menu


Create banner under left body and enquiry form in right body

All the component will automatically registered into app.module.ts
7. Lets astart creating the page UI
a. Creating the top menu items.
It is the boot strap menu and that you can get it from bootstrap 4 site

Now need to add the selector in App.module.ts
Like selected for menu bar in <app-menubar>

You will get the output as:

8. Changes in the other part of the modules,
Before that you can include the left and right component in the main component(app.component.html)

You can see you will get the output as.

Due to few changes in CSS, getting the orange menu. In Body section it defined into two parts as left body and right body.

9. Adding the banner into left body component.
Banner.component.html

Banner.component.css

Now add the banner component to Left Body component as like below.

You will get the output as the following.

Routing of Single Page application
Add modules in the application as same as header names
Create the list of components which is existing on the navigation bars as like below.
It will exist in the path of routes, create it as like.
Routes\home
Routes\offices
Routes\offers
Routes\newcources
Routes\virtulclasses

Now your app.module.ts will be look alike similar to below screen.
All the component that you have added will appear like below in module file.

Now import the routemodule in app.module.ts as like below

Create a constant of all the component for route and import it to the modules as like below.
In app.module.ts

Now go to the left menu component and changes the routing as like below.

register the route values which need to show, so open the left body component and provide place to view the component.
<router-outlet></router-outlet>


You will get the output as

Day 1
Day 2
Day 3
Day 4
No comments:
Post a Comment