
Download Visual Studio Code : Free IDE developed by microsoft which run under any platform.
Download Node JS :
What is node JS?
Node.js is an
open-source, cross-platform runtime environment for developing server-side Web
applications. Node.js worked under Chrome V8 JavaScript engine. Node.js was
developed by Ryan Dahl in 2009 and its latest version is v0.10.36. Node.js is a
runtime environment and library for running Javascript application outside the
browser.
When to use Node
NodeJs is great for
string or event based real time applications.
-
Streaming server
-
Chat Application
-
Real time and collaborative environment
-
Node is good if you need high concurrency but less CPU utilization.
-
Multiuser game
Node.Js is running under single
thread.
Setting Up the NodeJS,
You will need to
download and install the node.js runtime. Download NodeJS from here: http://nodejs.org/download/ and select windows
and install based on requirement of 32bit or 64Bit. After install you can check
the NodeJS have installed or not by C:\Program Files\nodejs.
There you can see the
NPM – it is use to setup the node package manager.
Now you can open the
nodeJs command from by start option Type nodeJs. Just type npm -h.
It will display the command
for npm.

First application of
Node in Visual Studio Code
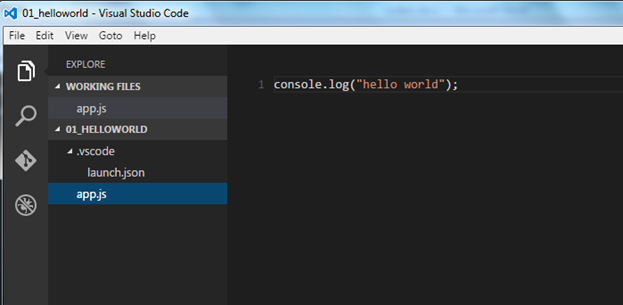
I created directive D:\NodeJs\nodesamples\01_helloworld and created file as app.js.
Now open that file in visual code by below command as;

Now you can see it will open the visual studio code for you
as like below and you have the file structure as:
Now lets write the code as console.log("hello
world"); in app.js and run that application. Now go to debug at the last
left icon(1) and run that application
(2). As you are running the application
first time it will ask to set up the environment select the node.js.(3)
Set up the configuration path as like below.

Now run the application and expected output value is Hello world will display in console.
Now you can see the result in console as;

Success: you have
created your first application of hello world.
Let’s move to create the first webapplication;
You need to invoke the Http api first to your application
as;
var http =
require('http'); // You require the
http api to invoke it
create the server
var server =
http.createServer(function (req, res) {
res.end('Hello World\n');
});
Defined the port on which server will run;
server.listen(3000);
Now run the application same as like below and you have full
code like below;

You will get output as;

REPL Terminal
REPL mis read Eval Print Loop, it is just like window
console and there you can perform the operations.
It perform following desired task.
Read : Read users
input, parse the input into Javascript and store into memory.
Eval : Evalaute
the data structure.
Print : print the
resul
loop : it will
loop command until user close it by ctrl +c twice.,
To Start REPL.
Just type node in node.js command prompt.

Now you can check with the simple expression like;
>6 + 9

You can perform multiline expression also like;

REPL Commands
ctrl + c -
terminate current command.
ctrl + d or ctrl + c
twice - terminate the Node REPL.
Up/Down Keys -
see the history and modify previous commands.
tab Keys - list
of current commands.
.help - list of
all commands.
.clear or .break
- exit from multiline expression.
Read File In Node JS
Now suppose
you want to read a file in nodeJs and want to display it into browser, for
reading the file you need to take the reference as like;
var fs =
require('fs');
Reading the text file as;
var con =
fs.readFileSync('mytest.txt').toString();
Now you have code like;

You will get output in browser as :

Wonderful video found in youtube and taking the reference from there also but its quite lengthy;
No comments:
Post a Comment